Condensed Milk Biscuits

DSC_0508
This recipe will make you seem like a domestic/baking goddess. Not only are these biscuits (or cookies for those playing along from distant lands) super delicious, super easy and super cheap. They are also really flexible.

The recipe below is for the biscuit base. You can bake them as they are and they’re pretty damn good or you can pimp them up, by adding, chocolate chips/chopped chocolate, dried fruit, hundreds and thousands, cocoa powder, cinnamon, peanut butter, coconut….. or add whatever you want. The ones pictured have dried strawberries and white chocolate chunks added to them.

How do these make you seem like a domestic/baking goddess, other you than the fact you’ve churned out some pretty fine biscuits? The recipe makes A LOT, enough for you to freeze some biscuits, which means you can pretty much pull them out the freezer, pop them into the oven and whip up a batch of fresh biscuits at a moments notice. Great for when people text you they’ll be over with next to no notice or you want to make your kids some fresh biscuits and score good mum points.

If you want to keep a whole heap on hand in the freezer it would be worthwhile thinking about doubling the recipe as in total this will give you around 60 biscuits. Plenty to bake now and plenty to bake later.

Condensed milk biscuits (cookies) – will make about 30

1/2 395 g tin condensed milk
250 g butter
1/2 cup sugar
2 1/2 cups of flour

Preheat oven to 180 degrees C

Cream butter and sugar together, then mix in flour and condensed milk to form a dough. From here you can add in any flavourings you want. I usually divide the dough up into several portions and make a few different flavours. You can also leave the dough plain if you want.

Once you’ve mixed your flavours up, roll the dough into plum sized balls and put on to baking paper lined trays and flatten slightly. Bake for approx 15 mins or until just starting to brown. Cool on trays.

If you’d like to freeze some, as above roll into balls and put on baking paper lined trays and flatten slightly. Put trays into freezer for a couple of hours or until frozen, then move biscuits into snap lock bags or tupperware containers. To bake take out and put on baking paper lined tray and leave for about 10 mins then pop into oven.
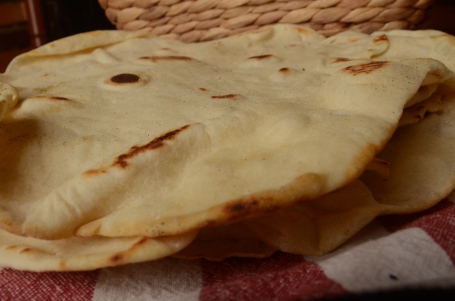
homemade wraps/tortillas

Image

I first made this recipe when my eldest child was a baby.  I was planing on making burritos for dinner but discovered I didn’t have any tortillas, logically one might pop off to shops for the required ingredient, but one problem, my baby was asleep and as any parent knows one of the golden rules with a baby is don’t wake a sleeping baby.  Also even if I did wake him up I would have to load him in the car, drive to the supermarket, fight for a carpark at the supermarket, get him out the car, hope he didn’t cry or vomit in the supermarket, then load him back in the car and go home.  All for a packet of tortillas.  So I busted out this recipe and they worked really well.  

I’ve made them many many times since because I like the fact I know whats in them, and because my family loves them and asks for them often.

They’re also so good when you need to stretch the budget, not only are they cheap to make, but can be used to stretch leftovers.  Got some casserole left over that’s not quite enough for a meal?  Wrap it up in one of these wraps, they are really filling so you make a smaller serving of casserole etc stretch.  They also work well as a substitute for nann bread to.

The only thing I find with them as they are a bit hard to roll out andIi can never get them as thin as shop bought ones, but that’s ok, it just makes them more filling.


Tortillas/wraps recipe adapted from Destitute Gourmet by Sophie Gray

2 /12 cups of four

1 tsp baking powder

1 tsp salt

3 tbls oil

about 1 cup of warm water


Combine flour, baking powder and salt in a  bowl of mixer. add oil and mix using a dough hook.  Gradually add enough water to form a soft dough.  Kneed in mixer for a bout 2 minutes rf by hand on floured surface for about 5 mins.  

Allow the dough to rest I’ve left it between 5 mins and 1/2 and hour and its been fine. 

Divide dough into about 8 pieces, less if you want large tortillas more if you want smaller tortillas, and roll out, try to get them pretty thin and may about 20 cms across.  Its not the easiest dough tot roll out so you may not get it in a perfect circle shape that’s ok.

Spray a hot pan with oil and cook them for about 30-60 secs until they bubble and get brown spots on them, turn over and cook other side.  repeat with remaining tortillas, re oiling pan in between each one.  

If not eating straight away cover with lightly damp clean tea towel.

cookbooks and blogs of the moment

DSC_0429

Anyone who’s been to my house knows I may have a slight problem with cookbooks.  Some may I have too many, to them I say pfft as if that’s possible.  

I thought I’d share a few I’m particularly enamored with right now, as well as a couple of blogs that I seem to be hitting up for recipes and ideas.

No surprise there’s a bit of a baking focus

Baking – from my house to yours by Dorrie Greenspan

The best way to describe this book is its baking porn, hundreds of baking recipes, she’s got, cakes, cookies, pies deserts and even breakfast sweets covered.  Beautiful photographs and recipes written in a really easy to follow way from a lady who worked on cookbooks with Julia Child.  Everything I’ve made from this book has worked perfectly.

Women’s Weekly Baking Day
Who doesn’t own a Women’s Weekly cooking book? This one has a bit of a focus on retro baking recipes and some more modern classics and has a very cute cover.  Cute pics and most importantly easy to follow recipes that work.

The Blue Ribbon Cookbook  -by Liz Harfull

A lovely collection on recipes that have won blue ribbons at South Australian country shows.  The recipes are as delightful as is reading about the history of various country shows and people behind the recipes.  Lovely historical and current photographs.

I’m also a bit addicted to reading cooking/food blogs. At the moment a couple of my go to blogs include

Bakeaholic Mama
Lovely blogger who posts always look delicious. Lots of baking recipes with a few savoury ones thrown in too. I’m just itching to try her cider yeast doughnuts.

Shutterbean
Some fantastic recipes often with some unusual flavour combinations, that at first you might question. 2 of our favourite pizza topping combos come from her site, bacon and brussel sprouts and corn, zucchini and lime pizza. Gorgeous photos of not only her recipes but of her life. Everything I’ve made form her site has worked.

What are some of your current cookbook or blog reads?

Homemade Bounty Bars

DSC_0163
You can make bounty bars and you’ll only need 3 ingredients.

Like me you’re thinking GET OUT OF HERE, WHY HASN’T THIS BEEN BROUGHT TO MY ATTENTION BEFORE!!!

So I’ve got a bit of a thing for coconut, coconut jam drops, coconut ice cream, lamingtons and now bounty bars.  

For a coconut lover like me I can’t fathom why I haven’t made them before.  As I said you only need 3 ingredients.  They’re so easy to make, the only cooking involved is melting chocolate and most of the time involved was the bars sitting in the freezer or fridge doing their thing .  Most importantly they were crazy delicious.

 Just a tip it’s important to test the coconut condensed milk mixture for quality control, however you’ll need self control while doing this otherwise you’ll devour the lot and have none to coat in chocolate.

Homemade Bounty Bars

3/4 Can Condensed milk

3 cups shredded coconut

450 g chocolate (I used 1/2 milk 1/2 dark because that ‘s what was in the cupboard, use what you prefer)

Put coconut into bowl, pour in condensed milk, mix thoroughly. 

Using wet hands shape into bar shapes and place on baking paper lined tray.  Put tray into freezer for a couple of hours to firm up.

Once the bars are firm, melt chocolate.  I usually do it in the microwave on high for 30 sec bursts stiring in between each burst. 

Working in batches take several of the bars out of the freezer (if you take them all out the ones you do last will have softened up) and coat in melted chocolate.  I find the best way is to roll them in chocolate with 2 forks and let any excess chocolate drip off.  Place on another baking a paper lined tray.

Repeat with remaining bars and either leave on bench or put in fridge to set chocolate, fridge is best if it’s warm to hot in your house plus they’ll be set quicker meaning you can enjoy them sooner 

Keep them stored in the fridge. I imagine these would last up to 4-5 days but they lasted just over a day in this house as they were so moreish.

Jam Drops

Image

Jam drops, sweet old fashioned jam drops have been in my biscuit making rotation for what seems like a long long time.  I know I’ve been making them since having children as page in the recipe book the recipe comes from has been drawn on (several times) by small children wielding pens.  

They’re a particular favourite in our house and everyone even our autistic son who’s super fussy about the food he eats, loves them.

They are so simple to make and have never let me down. This is my my tired and true recipe which I add coconut too, but that optional and you can leave it out if coconut isn’t your thing.


Jam drops – recipe adapted from The Country Women’s Association of Australia Country Classics

125g softened butter

3/4 cup sugar

2 eggs

2 cups self raising flour

2/3 cup desiccated coconut

Strawberry jam (or whatever other jam you fancy)


Preheat oven to 180 degrees.

Cream butter and sugar together.  Add eggs one at time and beat them in well.  Mix in sifted flour, then coconut.

Roll into balls about the size of a walnut and flatten slightly.  Using  end of a wooden spoon dipped in flour make a hole in each biscuit (its best if you kind of move the end of the wooden spoon around to make the hole a bit bigger then the size of the wooden spoon handle).

Fill holes with jam

Bake for 10 to 15 mins, then cool for a bit on trays before moving to cooling rack.

Enjoy

My Granny’s vegetable soup

Hi, its a been a while.  Life and lack of time and inspiration have conspired against me blogging, but I’m back and hopefully can blog more regularly.

Image

This post is my Granny’s vegetable soup.  My beautiful Granny passed away a few years ago just a few months short of her 90th Birthday.  To my knowledge she didn’t leave behind a folder full of her recipes, in fact I suspect she preferred reading and gardening to cooking, but like fact the teapot at my grandparents house was never allowed to be empty, in winter you couldn’t visit my grandparents without leaving with a container of Granny’s vegetable soup. I’m lucky and she shared her recipe with me, its yummy, filling, cheap and healthy and dead easy, Whenever I make it I’m transported back to my grandparents kitchen drinking endless cups of tea with them (or lemonade when I was younger)


All the quantities are approx and you can add more of 1 or 2 veggies if you like or omit others if you don’t have them (put don’t  skip the parsnip, turnips or swedes)

Granny’s vegetable soup

1/3-1/2 packet of yellow (not green) split peas (quantity depends on how much soup you are making and how thick you want it)

1 parsnip

1 turnips

1 swede

2 sticks celery

2 carrots

1 onion

2 potatoes

chunk of pumpkin

1 cup of frozen peas

Soak split peas overnight in water. Drain put in saucepan cover with lots of water, bring to boil, then simmer for about an hour.  You wan the peas to be quite soft.  Skim of any foam that rises to the top

While the peas are simmering, chop all the vegetables except the frozen peas.  You don’t wan’t them chopped too finely nor do you wan’t them particularly chunky, just make sure they are all about the same size.

Once the split peas are cooked, drain them then pop in soup pot and cover by a  few centimeters with water. You can either grab a potato masher and kind of mash them up or take about 1/2 the water peas mix and blend it up, then pop back with rest of the peas.  If you had a stab mixer you could probably use that ( I don’t so I use the blender).  What you want is a lumpy thick yellow split pea mixture.  Then put your all your veggies but the frozen peas in.  Bring to boil, simmer until veggies are nearly done, then put in frozen peas. Simmer until all veggies are cooked.

Serve with parsley.

This soup makes a large amount and keeps for a few days. It also freezes really well. 

Asparagus Tart

DSC_0049

On a whim last week I bought a bunch of Asparagus. I went to the supermarket for something else and of course bought more than was on my list including a bunch of Asparagus.

Once I got home I got season shopping guilt. Sure the sign said it was from Australia but was it really? I mean Asparagus is usually in season in spring and here it is the middle of Autumn. And if it was from Australia where in Australia did it come from , what sort of food miles were involved.

Once I had thoroughly over thought the matter I pondered what to make with the asparagus. I rather liked the idea of roasting it but couldn’t find much info on doing that so I settled on a tart, which given I adore puff pastry was fine for me.

Asparagus Tart – adapted from Joy the Baker

about 1/2 bunch asparagus (I ended up using 7 spears)
large handful of grated parmesan cheese
1 egg
balsamic vinegar
1 sheet puff pastry
olive oil

Preheat oven to 180 degrees C
defrost sheet of puff pastry
while puff pastry is defrosting trim asparagus spears
beat egg
cut defrosted puff pastry to a size just bigger than asparagus, brush with egg and sprinkle 1/2 the parmesan cheese on pastry
then lay asparagus over the top then top with remaining parmesan cheese, drizzle over some olive oil
bake until pastry is golden and puffed and asparagus is cooked through
drizzle balsamic vinegar of the top,
Enjoy

Chocolate Olive Oil Cake – Gluten & Dairy free

DSC_0125

I’ve been awfully quiet on the blog. First there was a trip to Thailand, then a spot of camping and last but not least I broke my arm. This puts me out of action on the cooking front although I’m trying madly to find recipes I can make one handed.

Anyway before the excitement of trips away and broken bones I had a few other minor health problems. One of the suggestions to help was a 2 week trial of being gluten free. I was resigned to not baking during that time, but the I stumbled upon this recipe from Nigella Lawson for a gluten and dairy free chocolate cake. I’ve never had much success with gluten free cakes, but if Nigella’s singing its praises it’s worth a go.

And….. it was so very very good. I think it was actually better eaten warm but was still pretty divine the next day.

Chocolate Olive Oil Cake – recipe adapted from Nigella Lawson
50 grams cocoa powder
125 ml boiling water
2 teaspoons vanilla extract
150 grams ground almonds (or Nigella says you can use 125g plain flour so obviously it becomes not gluten free & I didn’t make it this way so I can’t say what it would be like but probably pretty delicious)
½ teaspoon bi carb
200g sugar
3 eggs
150 ml olive oil (I just used everyday olive oil which I think would be best as it doesn’t have a massively strong flavour)
pinch of salt

Preheat oven to 170°C Grease springform tin with a little oil and line the base with baking paper.

Sift the cocoa powder into jug and whisk in the boiling water until you have a smooth, just runny paste. Whisk in the vanilla extract, then let cool a little.

In another bowl, combine the ground almonds with bi carb and pinch of salt.

Put the sugar, olive oil and eggs into the bowl of mixer and beat together on high for about 3 minutes until its a pale and like thickened cream.

Turn the speed down a little and pour in the cocoa mixture, beating as you go, when its all in slowly add the ground almond mixture.

Scrape down, and stir with a spatula, then pour batter into the tin. Bake for 40-45 minutes or until the sides are set and centre top still looks a bit moist. Check with a skewer and if it comes out clean with a few crumbs on it its done.

In its tin let the cake cool for 10 minutes on a cooling rack, and gently ease the sides of the cake with a small knife and spring it out of the tin.

Leave to cool completely or eat while still warm with some ice cream, as we did (thus making it not dairy free but I’m sure you can find a dairy free accompaniment or eat as is which given how good it is is perfectly justifiable)

Fig and Olive Oil Cake

DSC_0129
I truly believe that there are few things in the world that a cup of tea and piece of cake cannot fix. Bad day at work, cup of tea and cake make it better. Kids channelling the devil, tea and cake to the rescue. I’m quite sure many of the world’s conflict could be chatted out over a cup of team and a piece of cake.

I was recently given a bag of figs. These figs were bordering on over ripe and were sweet and soft. I felt rather lucky as they are so expensive at the shops and never as nice as home gown as they are so fragile. Given they were pretty ripe I set to working out what I could do with them. Of course being the baking addict I am I was like let’s make a cake with them. Out came the recipe books and internet searches before I settled on this recipe. I was a bit hesitant a you 1/2 bake the cake then add the figs, but it totally worked. It was moist, citrusy and figgy and perfect with a cup of tea.

Fig and Olive Oil Cake – recipe adapted from Shutterbean.com

1 3/4 cups flour
1 cup ground almonds
1 tablespoon baking powder
1 1/2 cups sugar
3 eggs
grated zest of 1 lemon
grated zest of 1 orange
1/2 cup orange juice
1/2 cup extra olive oil
1/3 cup milk
5 figs, cut into quarters
1 1/2 tbsp. honey

Preheat oven to 180 degrees. Grease a loaf tin and line with baking paper.

Mix together the flour, ground almonds, and baking powder in a bowl.

Using a whisk attachment in a mixer whisk the sugar and eggs until fluffy. Add the citrus zest and juice, then stir in the olive oil and milk. Gently fold in the flour mixture then pour the batter into a prepared tin and bake in the oven for approx. 40 minutes.

Push the figs into the top of the loaf. Drizzle with honey and bake for another 30-40 minutes, or until the top is caramelized and a skewer inserted comes out clean. Cool fully in tin, then remove from the tin.

Brew cup of tea, cut a large slice of cake and enjoy

coconut icecream

DSC_0094
Ice cream is usually made using eggs, and I have been known to make it that way (see champagne ice cream). But the problem with this is I use at a minimum twice the amount of ingredients. This would be because I get very easily distracted. So whilst I’m meant to be carefully stirring the egg mixture of a pot of simmering water I’m off getting distracted by glitter and unicorns or life. This means that if I’m not stirring the eggs at the right moment they over cook and turn into scrambled eggs. Now it may be just me but this is not really a desirable ingredient in ice cream.

So my go to everyday vanilla ice cream recipe is one that may not be as rich as others but it requires no eggs or stirring of ingredients of any kind over heat. I just chuck them in my mixer whisk to a bit frothy then pour in ice cream maker, which churns away for 20 mins and gives me ice cream (well it does after I freeze churned mixture for a few hours).

Anyway I got possessed by the need to make and eat coconut ice cream. After examine a few recipes on the internet I just decided to adapt my standard recipe and threw in some shredded coconut. Topped with melted dark chocolate it was rather like a frozen bounty bar.

Coconut Ice Cream

1 cup chilled cream
1 cup of chilled coconut cream
1 cup chilled milk
3/4 cup sugar
small handful of shredded coconut (optional)

In mixer with whisk attachment whisk together cream, coconut cream, milk and sugar. You want to whisk till the sugar has dissolved and its kinda frothy on op top. Pour into ice cream maker, churn. When it nearly done add in shredded coconut. Then pour into container freezer for a few hours till full frozen. If you don’t have an ice cream maker that ok, whisk it up then pop in freezer then whisk every 20 mins for a about 2 hours and it should get to the consistency of soft serve ice cream at which point add in shredded coconut stir and freeze.

I drizzled over some dark chocolate melted in the microwave and it set pretty quickly (a la homemade ice magic)

SABH_13-02_Chill-300a

Part of the Sweet Adventures Blog Hop – Licence to Chill Hosted by the Kitchen Crusader